Developing a website or web application can include any number of plugins and pre-processors that are tedious to manage. Enter Gulp.js, a build system that can automate repetitive tasks like compiling SASS into CSS, adding plugins, frameworks and libraries, checking your code for syntax errors and reloading the browser while you are editing content. This post should help you get started using Gulp to build your next project but it is not the only way or even the best way to use gulp, it’s just a starter, you may choose to organize your project very differently from the examples given here. If you haven’t already installed git and node.js please refer to previous posts Environment Setup for PC or Environment Setup for Mac depending on your operating system.
Overview
The example repository that we will be working from provides the following common things:
- An entry point into your website or application, usually
index.html. - A source folder for scripts, stylesheets and other html files, usually organized in a fashion that reflects your site structure.
- A place to download third party plugins.
- A way to compile SASS into CSS.
- A local web server.
- A way to automate repetitive tasks like updating CSS when adding new SASS, linting your code for mistakes and creating a minified build when you are ready to deploy to a live server.
Let’s start by cloning the example, open your console and navigate to your home directory.
cd "${HOME}"git clone https://github.com/SeattleFeministJS/Gulp-Development-Environment.gitnpm installbower installgulp serve
Using this repository as a guide let’s start a brand new repository on your own account and we will add each one of those things step by step.
Fork example repository
Sign into your Github account and go to our sample repository Gulp Development Environment. In the top right under your name you will see a button that says “Fork”, click that to copy the example repository to your github account.

When the forking is complete you will be taken to your github copy of the respository, copy the URL that is shown in the quick setup area.
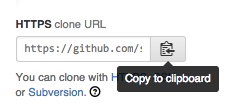
In your home directory open a command line and enter git clone followed by the URL that you copied from github GUI.
git clone https://github.com/simplesthing/Gulp-Development-Environment.git
Change directories to be inside your “Gulp-Development-Environment” directory.
cd Gulp-Development-Environment/
Install dependencies.
npm installbower install
Create a new Github repository
Sign into your Github account and go to /new, or click the + symbol next to your git username. Give your repository a name, add a small description and check the option to add a README. Now copy the URL that is shown in the quick setup area.

In your home directory open a command line and enter git clone followed by the URL that you copied from github GUI.
git clone https://github.com/simplesthing/test.git
Copy the .gitignore, .editorconfig and .jshintrc files from example repository into your new repository. Now create a src folder in the root of your project and inside that add an index.html. Go ahead and add standard <html>, <head> and <body> tags and let’s also add message to ourselves like “Hello World”.
<!DOCTYPE html>
<html lang="en">
<head>
  <meta charset="UTF-8">
  <title>Document</title>
</head>
<body>
  <h1>Hello World</h1>
</body>
</html>
Automate all the things
Now we’re ready to start using Gulp to automate some development tasks. On the command line navigate into your new repository and if you have followed the setup instructions from previous post you should already have Bower and NPM installed globally and ready to use. We’re going to initialize an NPM package.json file by typing npm init. It will ask a few questions about the project, you can enter answers or hit enter to accept defaults, and save a package.json file to the root of your project. Now that we have a package.json we can start adding our development tools, the first thing we’re going to need is get Gulp, in your command line enter:
npm install --save-dev gulp
We’ll need to create gulpfile.js in our project root. Start that file by declaring a variable for gulp
var gulp = require('gulp');
This is a pattern which we would have to use for every node module that we add to the project and want to use in our gulpfile except we’re going to use a utility called gulp-load-plugins which will automate that repetitive task and require any module that begins with gulp- so that we don’t have to. In command line type
npm install --save-dev gulp-load-plugins
Now in our gulpfile add
var $ = require('gulp-load-plugins')();
Now whenever we want to use a gulp- module we can refer to using the $. to prefix followed by the name of the module, for example if we were to add a module called ‘gulp-example’ we could call that module from within our gulpfile by using $.example.
Adding third party libraries using Bower
Almost every web application uses some third party libraries to enhance functionality, so let’s add some to ours we’ll start off with three very common ones jQuery, Bootstrap SASS, and Fontawesome. Back on the command line enter bower init this will initialize bower and create a bower.json by asking you a few questions about your project. Now we have a bower.json file we can use the command line to add packages and save them to bower.json which can be used to install your project anywhere.
Adding these libraries enter the following commands
bower install jquery --savebower install fontawesome --savebower install bootstrap-sass --save
You should see that a directory named /bower_coponents has been added to your project and plugins have been installed. but we need to have them added to our index.html for us whenever we add new ones. So let’s install wiredep to do this for us.
“How it works Installing a Bower package with –save will add the package as a dependency in your project’s bower.json file. This library reads that file, then reads the bower.json files for each of those dependencies. Based on these connections, it determines the order your scripts must be included before injecting them between placeholders in your source code.”
npm install --save-dev wiredep
Since this is not a ‘gulp-‘ prefixed package we are going to have to require the package ourselves by adding a new var at the top of our gulpfile.
var wiredep = require('wiredep').stream;
To create a new task for gulp to execute we use the gulp library function call gulp.task(name[, deps], fn) where we pass in task name, optional array of dependencies, and a callback function. Now we can add a new task called wiredep below our styles task.
gulp.task('wiredep', function(){

});
Inside the wiredep callback we are going to return our source which is our index.html file.
return gulp.src(['src/index.html'])
gulp.task('wiredep', function(){
  return gulp.src(['src/index.html'])
});
Pipe the source to the wiredep function and write to our src directory destination.
.pipe(wiredep())
.pipe(gulp.dest('build'));
gulp.task('wiredep', function(){
  return gulp.src(['src/index.html'])
    .pipe(wiredep())
    .pipe(gulp.dest('build'));
});
Lastly we’ll need to add placeholders in our index.html to tell wiredep where to add our plugin files, add the following to the head section of your index.html.
<!-- bower:css -->
<!-- endbower -->
<!-- bower:js -->
<!-- endbower -->
Go ahead and run gulp wiredep and you should now see that the index.html file has added fontawesome.css in between the css placeholders and added jquery.js and bootstrap.js between the js placeholders.
Get Sassy
Now let’s add some style to our site by creating a /styles directory to our /src and inside that add a styles.scss and a _main.scss file to that same directory.
Inside _main.scss and add a body style with a background color and a text color, for example.
body {
  background: #FF05DE;
  color: #05FF26;
}
In our styles.scss we can import our main file by adding following.
@import "main";
Let’s add some bootstrap by copying the file at
/bower_components/bootstrap-sass/assets/stylesheets/_bootstrap.scss
into a file in your /src/styles directory named _bootstrap.scss. Then update all the @import paths to add ../../bower_components/bootstrap-sass/assets/stylesheets/ to the beginning of the file paths so they look like this
@import "../../bower_components/bootstrap-sass/assets/stylesheets/bootstrap/variables";
Now add @import "bootstrap"; to your styles.scss file at the very top, above your main.
We’ll be using a few different packages to compile, minify, create sourcemaps and watch our sass files while we are developing them. On the command line type the following.
npm install --save-dev gulp-sassnpm install --save-dev gulp-sourcemapsnpm install --save-dev gulp-autoprefixer
In our gulpfile let’s start adding a task to compile our sass into css called ‘styles’, add the following above the ‘serve’ task.
gulp.task('styles', function(){
});
Inside the callback we need to acquire our source sass files in order to return them back to the gulp stream by calling the gulp src function gulp.src(globs[, options]) and passing in an array of globs, filepaths that can use ‘wildcards’ characters, followed by an optional options object, which we won’t be using this time. Since we are using the style.scss to import all of our sass files we don’t need to pass in anything other than this file.
gulp.task('styles', function(){
  return gulp.src(['src/styles/styles.scss'])
});
Now we want to pipe those files to the next process ‘gulp-sourcemaps’, which will add inline references to the sass source code that was used to create the final CSS output which is used when debugging in the browser to find the location in you source SASS files of compiled CSS. We will pass our source files stream into the next step by calling
$.sourcemaps.init().
gulp.task('styles', function(){
  return gulp.src(['src/styles/styles.scss'])
    .pipe($.sourcemaps.init())
});
To compile our SASS we want to call gulp-sass and pass in a options object by adding
.pipe($.sass({precision: 10,errLogToConsole: true})).
gulp.task('styles', function(){
  return gulp.src(['src/styles/styles.scss'])
    .pipe($.sourcemaps.init())
    .pipe($.sass({
      precision: 10,
      errLogToConsole: true
    }))
});
The first option precision tells the compiler how many digits after a decimal place will be allowed when calculating values in CSS measurement such as pixels or em’s. The second option is called if an error occurs during compilation and will log that error to the console.
Now that we have our SASS converted to CSS we’d like gulp to add our browser prefixes for us by using gulp-autoprefixer but first we need to tell it which browsers we are interested in adding prefixes for by adding a configuration object. In our gulpfile near the top where we declare our vars add the following, which adds support for most major browsers.
var AUTOPREFIXER_BROWSERS = [
  'ie >= 10',
  'ie_mob >= 10',
  'ff >= 30',
  'chrome >= 34',
  'safari >= 7',
  'opera >= 23',
  'ios >= 7',
  'android >= 4.4',
  'bb >= 10'
];
Back in our ‘styles’ task callback add the following line to add our browser prefixes.
.pipe($.autoprefixer({browsers: AUTOPREFIXER_BROWSERS}))
gulp.task('styles', function(){
  return gulp.src(['src/styles/styles.scss'])
    .pipe($.sourcemaps.init())
    .pipe($.sass({
      precision: 10,
      errLogToConsole: true
    }))
    .pipe($.autoprefixer({browsers: AUTOPREFIXER_BROWSERS}))
});
Now that our CSS is finished we can call to gulp-sourcemaps to write our sourcemap files.
.pipe($.sourcemaps.write())
gulp.task('styles', function(){
  return gulp.src(['src/styles/styles.scss'])
    .pipe($.sourcemaps.init())
    .pipe($.sass({
      precision: 10,
      errLogToConsole: true
    }))
    .pipe($.autoprefixer({browsers: AUTOPREFIXER_BROWSERS}))
    .pipe($.sourcemaps.write())
});
Finally we want to write our CSS to a file in our build/styles directory. Note that we are adding a /build directory to our project using gulp which is where we will be moving files to as we add them to the project
.pipe(gulp.dest('src/styles'))
gulp.task('styles', function(){
  return gulp.src(['src/styles/styles.scss'])
    .pipe($.sourcemaps.init())
    .pipe($.sass({
      precision: 10,
      errLogToConsole: true
    }))
    .pipe($.autoprefixer({browsers: AUTOPREFIXER_BROWSERS}))
    .pipe($.sourcemaps.write())
    .pipe(gulp.dest('./build/styles'));
});
Give it a try by running gulp styles in your command line you will see the output is executing styles then creating a new directory structure /build/styles and writing you CSS in there along with sourcemap comments pointing back to original SASS code files.
Checking your JavaScript for Errors
Add a new directory inside your /src directory called scripts and inside there add a new JavaScript file called main.js. Inside that file let’s add a a simple script to append a message to index on page load using jQuery.
$(document).ready(function(){
  $('body').append('<h2>It works!</h2>');
});
Now we are going to want to run jshint to check for errors in JavaScript. To setup jshint we will be using the rules from the .jshintrc file that we copied over from example repository, next we need to install the jshint module and a reporter module for printing reports to console.
npm install --save-dev gulp-jshintnpm install --save-dev jshint-stylish
Now we can add a new task to our gulpfile for linting our code to check for errors, we’ll call it ‘scripts’.
gulp.task('scripts', function(){

});
Inside that callback we return a source glob of all JS files in src.
return gulp.src('src/**/*.js')
gulp.task('scripts', function(){
  return gulp.src('src/**/*.js')
});
Then we can call to jshint to run it’s linter.
.pipe($.jshint())
gulp.task('scripts', function(){
  return gulp.src('src/**/*.js')
    .pipe($.jshint())
});
We tell jshint to pipe results to the reporter
.pipe($.jshint.reporter('jshint-stylish'));
gulp.task('scripts', function(){
  return gulp.src('src/**/*.js')
    .pipe($.jshint())
    .pipe($.jshint.reporter('jshint-stylish'))
}); And finally to write the files to the build directory.
.pipe(gulp.dest('build'));
gulp.task('scripts', function(){
  return gulp.src('src/**/*.js')
    .pipe($.jshint())
    .pipe($.jshint.reporter('jshint-stylish'))
    .pipe(gulp.dest('build'));
});
If you try running your new task, gulp scripts you should see that jshint has found some issues that we need to fix, the first line tells you which file the issues are in and then each issue with line numbers.
/Users/avacollins/test/src/scripts/main.js
line 2  col 3  Missing "use strict" statement.
line 1  col 1  '$' is not defined.
line 2  col 3  '$' is not defined.
We did not add the use strict directive at the top of the file and we did not declare the global varaible $ which is added to the global object by jQuery. Inside main.js let’s add
"use strict;"
to the very top of the file and below add
/* global $ */
This instruct jshint that $ is a global variable added to window by jQuery. Now re-run gulp scripts and everything should check out as well as you should now see a /build/scripts directory with your main.js copied.
Injecting CSS and JavaScript
Now we’re can use gulp-inject to add our CSS and JS to our index.html, in the command line let’s install the package.
npm install --save-dev gulp-inject
Now in our gulpfile in near the top add the gulp-inject options object as a variable.
var INJECT_OPTS = {
      addRootSlash : false,
      relative     : true
};
Below the styles task add the following inject task.
gulp.task('inject', function(){

});
Inside the inject task callback start by declaring a variable for our assets to be injected, note that this is an array which you can add additional file globs to as your project grows and all of them will be injected.
var assets = gulp.src(['build/**/*.css', 'build/**/*.js']);
gulp.task('inject', function(){
  var assets = gulp.src(['build/**/*.css', 'build/**/*.js']);
});
Then we acquire and return the source html which we will be adding our assets to, again note that source is an array and you can add additional files here as needed also.
return gulp.src(['build/index.html'])
gulp.task('inject', function(){
  var assets = gulp.src(['build/**/*.css', 'build/**/*.js']);
  return gulp.src(['build/index.html'])
});
Pipe our source to gulp-inject passing in our assets variable and our inject options.
.pipe($.inject(assets, INJECT_OPTS))
gulp.task('inject', function(){
  var assets = gulp.src(['build/**/*.css', 'build/**/*.js']);
  return gulp.src(['build/index.html'])
    .pipe($.inject(assets, INJECT_OPTS))
});
Now return our source back into src directory as well as into our distribution directory.
.pipe(gulp.dest('build/'))
gulp.task('inject', function(){
  var assets = gulp.src(['build/**/*.css', 'build/**/*.js']);
  return gulp.src(['build/index.html'])
    .pipe($.inject(assets, INJECT_OPTS))
    .pipe(gulp.dest('build'));
});
Lastly we need to tell gulp-inject where in our index.html we want to inject our assets, so inside our index.html file we need to add the following in the head area, below our bower placeholders that were added earlier.
<!-- inject:css -->
<!-- endinject -->
<!-- inject:js -->
<!-- endinject -->
Before we can try out our new inject task , we first have to run our wiredep task which will copy over our index.html with the new inject placeholders, in the command line first run gulp wiredep then gulp inject. Now open up your src/index.html you will see that your styles.css and main.js has been added.
Copy images and other assets
Last thing that we need to do before starting up server is to copy any images, or other assets, that aren’t getting moved into the build folder. Go ahead and add an images directory to your /src directory and copy over any image into that directory. Let’s also add the image to our src/index.html after our message.
<img src="images/adaTheFirst.jpg" alt="Ada Lovelace, The first Programmer">
This task is simple and no npm packages are required. Add the following task to your gulpfile.
gulp.task('copy', function(){

});
Inside the callback we start by returning our source globs, looking for everything in /src except for the processed files which are already in /build.
return gulp.src(['src/**/*.*', '!src/**/*.scss', '!src/**/*.js', '!src/index.html'])
gulp.task('copy', function(){
   return gulp.src(['src/**/*.*', '!src/**/*.scss', '!src/**/*.js', '!src/index.html'])
}); And piping that into it's destination `/build`.
.pipe(gulp.dest('build'));
gulp.task('copy', function(){
   return gulp.src(['src/**/*.*', '!src/**/*.scss', '!src/**/*.js', '!src/index.html'])
    .pipe(gulp.dest('build'));
});
Now you can run gulp copy and you shoudl see that your images directory has been moved over to the build directory.
Build
Now that we have individual tasks to process all our code let’s put it all together to create a build of our files in one step. Here is where JavaScript gets tricky, node.js and gulp.js are asynchronous, which means that tasks will execute in which ever order your computer processes the fastest, they most likely will not execute in the order in which you called them. This issue can break our injects and copies and wreak havoc on our development environment. To fix this we’ll use run-sequence.
npm install --save-dev run-sequence
Since this is not a ‘gulp-‘ prefixed package we are going to have to require the package ourselves by adding a new var at the top of our gulpfile.
var runSequence = require('run-sequence');
Now we can add our build task.
gulp.task('build', function(){

});
And inside our build task callback let’s make a call to runSequence and pass in all of our tasks. Tasks that are included in an Array are tasks that can be run in paralell safely, tasks that are passed in a a String should run to completion, before the next task can start. In our example we have two sets of parallel tasks.
runSequence(['styles', 'wiredep', 'scripts'], ['inject', 'copy']);
gulp.task('build', function(){
  runSequence(['styles', 'wiredep', 'scripts'], ['inject', 'copy']);
});
Go ahead and run gulp build and you should see your tasks executing in console output.
Adding a local web server
Now we ready for a server to run our code, instead of setting up Apache, or use node’s connect middleware we’ll be using Browsersync a tool which will run a local server while you develop and will reload files that change as you change them. There are a ton of great features and examples that can be found through the browsersync.io website. First add the Browsersync module to our project through command line and npm.
npm install --save-dev browser-sync
Back in our gulpfile we need to require the module and assign it to a variable.
var browserSync = require('browser-sync');
Since we are using RunSequence to order our tasks we can take advantage of a feature which allows us to pass in a callback as the last parameter in a sequence, which means that we will be calling BrowserSync as a function instead of a gulp task. Add the following function to your gulpfile.
function serveCallback() {
   browserSync({
    server: ['build', './']
  });
}
Here we are telling BrowserSync to start a new server and to serve files from the /build and root ./ directory of our project. We are using a very simple implementation of BrowserSynce, there are many possible options that you use and can read more about here.
Now let’s create a task to serve our build files.
gulp.task('serve',  function(){

});
And very simply we add a runSequence with the same tasks as the build task, and a callback to our server.
gulp.task('serve', function(){
  runSequence(['styles', 'wiredep', 'scripts'], ['inject', 'copy'], serveCallback);
});
Let’s give it try, on the command line type gulp serve you should see output as gulp processes the command and Browsersync launches a new web server, it should also open your index.html for you. After we verify that it is working we can tell BroswerSync to quit by typing ctrl c (on Mac).
Watch it!
Now let’s add some functions to listen for changes in our source code and re-run our tasks and reload the browser for us so that we don’t have to stop and manually do those things. First let’s install the gulp-watch module from npm.
npm install --save-dev gulp-watch
Also let’s add a variable to the top of our gulpfile to call BrowserSync’s reload function so we can manually trigger a reload.
var reload = browserSync.reload;
Let’s start by adding a new task called watch:html.
gulp.task('watch:html', function(){

});
Now add a sequence to run wiredep and inject and finally reload the browser with new content.
gulp.task('watch:html', function(){
  runSequence('wiredep', 'inject', reload);
});
Inside our serve task let’s add a line below runSequence that will handle watching our html by first passing a glob of files to watch and then tasks to be run when changes are detected.
gulp.watch(['src/**/*.html'], ['watch:html']);
Now let’s add a watch for our styles to compile and reload the css file in the browser so you can immediately see the changes.
gulp.watch(['src/**/*.scss'], ['styles', reload]);
Finally add a watch for our JavaScript files to be linted and copied when we make changes.
gulp.watch(['src/**/*.js'], ['scripts', 'copy', reload]);
Restart your serve task and change your background color in main.scss, change your message in your main.js, add some new text to your index.html, all of these changes should trigger the tasks to be re-run and you should see the changes immediately reflected in the browser. Prett nifty huh?
Distribute
Well now it feels like we have a pretty good development environment setup, but what about when we are ready to publish our code to a live server? We’re going to need to add a few more tasks that will create a web ready distribution of our code. Let’s add some new tasks similar to our build tasks but add the suffix :dist to tell us that this is the distribution version of building.
Starting with wiredep, we are gong to need to do some extra steps for our bower_components because we do not want to publish the entire bower repository to our web server, just the code that we need. We’ll also need to copy over component assets like fonts. Let’s start by adding a new fonts task.
Fonts
gulp.task('fonts', function(){

});
Since we have fontawesome we start by returning the source fonts.
return gulp.src(['bower_components/fontawesome/fonts/**/*.*'])
gulp.task('fonts', function(){
  return  gulp.src(['bower_components/fontawesome/fonts/**/*.*'])
});
And pipe those over to our /dist directory, where all of our final build will go.
.pipe(gulp.dest('dist/fonts'));
gulp.task('fonts', function(){
  return  gulp.src(['bower_components/fontawesome/fonts/**/*.*'])
    .pipe(gulp.dest('dist/fonts'));
});
Go ahead and run gulp fonts to test it out, also we can add an icon to our index.html to verify that things are working when we run our final build.
<i class="fa fa-diamond"></i>
Minify
Next we are going to want to concatenate all our bower components into a single file and then run a minifier to remove comments and whitespace to optimize download speeds.
npm install --save-dev gulp-concatnpm install --save-dev gulp-uglify
Now let’s add a task for our bower JavaScript dependencies below our wiredep task.
gulp.task('wiredep:js:dist', function(){

});
Return our source, which is a function of the wiredep library to get all JavaScript.
return gulp.src(require('wiredep')().js)
gulp.task('wiredep:js:dist', function(){
  return gulp.src(require('wiredep')().js)
});
Pipe that over to gulp-concat and tell it to create a file named vendor.js from the all the files.
.pipe($.concat('vendor.js'))
gulp.task('wiredep:js:dist', function(){
  return gulp.src(require('wiredep')().js)
    .pipe($.concat('vendor.js'))
});
Pipe again to gulp-uglify.
gulp.task('wiredep:js:dist', function(){
  return gulp.src(require('wiredep')().js)
    .pipe($.concat('vendor.js'))
    .pipe($.uglify())
});
And finally write our file to our /dist directory.
gulp.task('wiredep:js:dist', function(){
  return gulp.src(require('wiredep')().js)
    .pipe($.concat('vendor.js'))
    .pipe($.uglify())
    .pipe(gulp.dest('dist/scripts'));
});
Let’s test by running gulp wiredep:js:dist. You should see a minified file named vendor.js creates and saved in your /dist/scripts directory.
Let’s do essentially the same thing for our CSS now. Start by installing gulp-csso, a package to minify CSS.
npm install --save-dev gulp-csso
Add a new task.
gulp.task('wiredep:css:dist', function(){

});
Return our source.
return gulp.src(require('wiredep')().css)
gulp.task('wiredep:css:dist', function(){
   return gulp.src(require('wiredep')().css)
});
Pipe that to gulp-concat and name final file vendor.css.
gulp.task('wiredep:css:dist', function(){
   return gulp.src(require('wiredep')().css)
    .pipe($.concat('vendor.css'))
});
Pipe into gulp-csso to do it’s thing.
gulp.task('wiredep:css:dist', function(){
   return gulp.src(require('wiredep')().css)
    .pipe($.concat('vendor.css'))
    .pipe($.csso())
});
Finally write our output to /dist/styles directory.
gulp.task('wiredep:css:dist', function(){
   return gulp.src(require('wiredep')().css)
    .pipe($.concat('vendor.css'))
    .pipe($.csso())
    .pipe(gulp.dest('dist/styles'));
});
Go ahead and run gulp wiredep:css:dist to test.
Let’s do the same for our own JavaScript and styles. Below our styles task add a new task.
gulp.task('styles:dist', function(){

});
Start by returning our source, which is our compiled CSS in the build directory.
return gulp.src(['build/styles/styles.css'])
gulp.task('styles:dist', function(){
  return gulp.src(['build/styles/styles.css'])
});
Pipe that into the minifier.
.pipe($.csso())
gulp.task('styles:dist', function(){
  return gulp.src(['build/styles/styles.css'])
    .pipe($.csso())
});
And write our final file to the /dist/styles directory.
 gulp.task('styles:dist', function(){
  return gulp.src(['build/styles/styles.css'])
    .pipe($.csso())
    .pipe(gulp.dest('dist/styles'));
});
Test it out, gulp styles:dist.
And for our JavaScript let’s add a task.
gulp.task('scripts:dist', function(){

});
Return our source from the build directory.
return gulp.src(['build/**/*.js'])
gulp.task('scripts:dist', function(){
  return gulp.src(['build/**/*.js'])
});
Concatenate into a single file app.js.
.pipe($.concat('app.js'))
gulp.task('scripts:dist', function(){
  return gulp.src(['build/**/*.js'])
    .pipe($.concat('app.js'))
});
Minify code.
.pipe($.uglify())
gulp.task('scripts:dist', function(){
  return gulp.src(['build/**/*.js'])
    .pipe($.concat('app.js'))
    .pipe($.uglify())
});
Write to our dist/scripts directory.
.pipe(gulp.dest('dist/scripts'));
gulp.task('scripts:dist', function(){
  return gulp.src(['build/**/*.js'])
    .pipe($.concat('app.js'))
    .pipe($.uglify())
    .pipe(gulp.dest('dist/scripts'));
});
Test it out gulp scripts:dist
Copy assets
Copying our assets is the same process as it was for our development build, we just have different sources and destinations. Add your task.
gulp.task('copy:dist', function(){

});
Return source globs from /build directory
gulp.task('copy:dist', function(){
  return gulp.src(['build/**/*.*','!build/**/*.css', '!build/**/*.js', '!build/index.html', 'src/index.html'])
});
Pipe to /dist destination.
.pipe(gulp.dest('dist'));
gulp.task('copy:dist', function(){
  return gulp.src(['build/**/*.*','!build/**/*.css', '!build/**/*.js', '!build/index.html', 'src/index.html'])
    .pipe(gulp.dest('dist'));
});
Test it out gulp copy:dist
Injecting
Injecting our assets is exactly the same as before with the exception of our source values which need to be injected in a specific order, meaning third party assets first. To do that we need to install stream-series to manage the order for us.
npm install --save-dev stream-series
Since it is not a gulp- prefixed package we need to add our variable reference to the top of our gulpfile.
var series = require('stream-series');
We’re also going to want to minify our html after injecting our assets, so we’ll need to get gulp-minify-html from npm.
npm install --save-dev gulp-minify-html
Let’s add our task.
gulp.task('inject:dist', function(){

});
We need to add a couple variables one for each source.
var vendor = gulp.src(['dist/scripts/vendor.js', 'dist/styles/vendor.css']);
var app = gulp.src(['dist/scripts/app.js', 'dist/styles/styles.css']);
gulp.task('inject:dist', function(){
  var vendor = gulp.src(['dist/scripts/vendor.js', 'dist/styles/vendor.css']);
  var app = gulp.src(['dist/scripts/app.js', 'dist/styles/styles.css']);

});
Return our source index.html from the /dist directory, you will need to have run gulp copy prior to this to ensure that your source is in the /dist directory.
return gulp.src(['dist/index.html'])
gulp.task('inject:dist', function(){
  var vendor = gulp.src(['dist/scripts/vendor.js', 'dist/styles/vendor.css']);
  var app = gulp.src(['dist/scripts/app.js', 'dist/styles/styles.css']);

  return gulp.src(['dist/index.html'])
});
Pipe that into gulp-inject using stream-series to manage the ordering.
.pipe($.inject(series(vendor, app), INJECT_OPTS))
gulp.task('inject:dist', function(){
  var vendor = gulp.src(['dist/scripts/vendor.js', 'dist/styles/vendor.css']);
  var app = gulp.src(['dist/scripts/app.js', 'dist/styles/styles.css']);

  return gulp.src(['dist/index.html'])
    .pipe($.inject(series(vendor, app), INJECT_OPTS))
});
Minify the html
.pipe($.minifyHtml())
gulp.task('inject:dist', function(){
  var vendor = gulp.src(['dist/scripts/vendor.js', 'dist/styles/vendor.css']);
  var app = gulp.src(['dist/scripts/app.js', 'dist/styles/styles.css']);

  return gulp.src(['dist/index.html'])
    .pipe($.inject(series(vendor, app), INJECT_OPTS))
    .pipe($.minifyHtml())
});
And write the out put to the /dist directory.
.pipe(gulp.dest('dist'));
gulp.task('inject:dist', function(){
  var vendor = gulp.src(['dist/scripts/vendor.js', 'dist/styles/vendor.css']);
  var app = gulp.src(['dist/scripts/app.js', 'dist/styles/styles.css']);

  return gulp.src(['dist/index.html'])
    .pipe($.inject(series(vendor, app), INJECT_OPTS))
    .pipe($.minifyHtml())
    .pipe(gulp.dest('dist'));
});
Test it out gulp inject:dist
Serve your distribution build
Almost done! Last step to building and deploying your project is to serve your distribution build, which is very similar to what we’ve done with the development build. Add your distribution serve callback function, just like before but we are now serving files only from the /dist directory.
function serveDistCallback() {
    browserSync({
    server: ['dist']
  });
}
Add your distribution serve task.
gulp.task(‘serve:dist’, function(){
});
Call runSequence and pass in your build steps, and end with your serve callback. ` runSequence([‘styles’, ‘scripts’],’copy’, [ ‘wiredep:css:dist’, ‘wiredep:js:dist’, ‘styles:dist’, ‘scripts:dist’,’copy:dist’, ‘fonts’], ‘inject:dist’, serveDistCallback);`
gulp.task('serve:dist', function(){
  runSequence(['styles', 'scripts'],'copy', [ 'wiredep:css:dist', 'wiredep:js:dist', 'styles:dist', 'scripts:dist','copy:dist', 'fonts'], 'inject:dist', serveDistCallback);
});
Test it out gulp serve:dist
##Links for further reading